How to start with HDR Photography – TUTORIAL
PART ONE – INTRODUCTION TO HDR PHOTOGRAPHY
What is HDR ?
You probably already know that HDR is the acronym for High Dynamic Range but what exactly does it mean?
Our DSLRs are not capable of capturing a high dynamic range scene, with all the details, in the same way our eyes can, and this makes the photograph rather dull and less pleasing to look at.
Take a moment and imagine you are inside a room and you look around you. When you look out of the window where the sunlight is bright, your eyes will adapt to the highlights in a way that you can see details in the brightest parts of the scene outside. Now when you look back into the room at the darker parts of the room where little light is available, again your eyes will adapt quickly so you can see a lot of detail in these darker parts of the room too.
In other words the human eye can cover a broad spectrum of light levels in the scene at which it is looking. It can see the details in the shadows and simultaneously see the detail in the highlights.
The human eye has an incredible dynamic range, which is significantly higher than most DSLR cameras (the human eye has about twice the dynamic range than a DSLR). The sensors in digital cameras cannot capture such a high difference in light levels between the lightest and darkest area of a scene.
When a scene has an extremely broad range from the darkest shadow to the brightest highlight, we say the scene has a high dynamic range. The problem with digital cameras is that their dynamic range is fairly limited (at least when compared to our eyes). This means that if you set the exposure of the camera to see details in the shadows, then your highlights are typically completely white or “blown out.” And vice-versa, if you set the exposure of the camera to see details in the highlights of the scene, generally the shadows become fully black or “clipped.”
Look at the example below where I shot a couple into the sun:

What can we do about it?
Modern photographing techniques (such as exposure bracketing) and advanced post-processing software allow us to overcome the limitations of the camera sensor and retrieve the pleasing experience we had when looking at the scene with our eyes.
Applying these techniques to reproduce an image that resembles what is seen by the naked eye is basically what HDR photography is all about.
Sometimes an HDR photograph has a stronger emotional impact and a much higher wow factor than a normal photo. An HDR photograph can create a pleasing feeling and has the ability to make people feel as if they were in the actually there, in the scene, looking around.
So, this is what we know now :
High Dynamic Range (HDR) photography refers to a popular photographic technique designed to overcome the limitations of image sensors in digital photographs.
Applying these techniques to reproduce an image, that resembles what is seen by the naked eye, is basically what HDR photography is all about.
HDR is a process that utilizes multiple exposures of the same subject, each shot at different exposure values (“brackets”). Those are then automatically merged into a single shot which encompasses a greater exposure range.
Why should I care?
Sometimes an HDR photograph has a stronger emotional impact and a much higher wow factor than a normal photo. An HDR photograph can create a pleasing feeling and has the ability to make people feel as if they were in the actually there, in the scene, looking around.
Photography is an art, painting with light, and as long as people can enjoy your creations, it is ok to make a HDR, nevertheless what some ‘professionals’ or critics may say. I am definitely a fan of HDR and will always strive to create realistic-looking HDR images, which make an impact on people.
Taking a HDR Photograph
When we want to photograph a scene that has a wide “dynamic range”, we can overcome the limitations of DSLR’s limited dynamic range by taking multiple images with different exposure levels and combine them later in such a way that we get more details in the highlights and in the darks.
Making multiple pictures with different exposure levels is called Exposure Bracketing. It basically means that we take a set of exposures, usually three, five or seven, at different exposure values. Most photographers use a difference in exposure of one stop (1 EV) of light.
There are a number of ways to do this. If you are shooting in manual mode you can take the extra photos, at different brightness levels, simply by adjusting the shutter speed. The easiest way to do this, for example for 3 different exposures, is by metering the scene for the middle (correct) exposure, then double the shutter speed and you can take the -1 EV shot. Next you halve the shutter speed and you can take the 0 EV shot. And finally you halve the shutter speed once again to take the +1 EV shot.
Most DSLRs come with Automatic Exposure Bracketing (AEB), which allow us to take a number of photographs in automatic mode. We can set the number of pictures (brackets) we want to take and the difference in exposure between each picture. By selecting AEB on your camera, you can quickly take multiple shots (usually three) at different exposures without having to manually change the shutter speed settings between the frames.
Here you can see an example of five pictures shot with an exposure difference of one stop:

The shutter speed decreases every times with 50% resulting in an exposure difference of one complete stop. You can clearly see the difference in details we can see in the sky. The sky is completely blown out when we the buildings are correctly exposed.
The best way of taking multiple exposure of the same scene is to use a tripod or some other way to stabilize your camera. It is possible to shoot by hand if you must and only if your camera has an Automatic Exposure Bracketing mode, but it is likely that you will encounter problems aligning your images later on, so a tripod is generally speaking the best way to ensure a stable shot.
In Part two we will see how we merge the different frames into an HDR photograph, but let’s take a look now first at the basic requirements for taking these shots.
Equipment Requirements for making an HDR Photograph
The basic gear requirements for making HDR photographs are twofold :
- a tripod
- a digital camera
Why do I need a tripod?
We need to make multiple pictures with different exposures of the same subject.
Sometimes, and especially in low-light settings (evening and at night), taking a photograph will ask for a long exposure time (multiple seconds), so some way to stabilize our camera is required.
When photographing HDR images, it is very important that the camera remains still and that there is no camera movement while shooting your images. Otherwise your photographs will be blurry and not usable for creating a good HDR photograph. Sharp images may be required for future alignment of the multiple images.
It goes without saying that the best way of taking multiple exposure of the same scene, while keeping your camera motionless, is to use a tripod.
It is possible to shoot by hand if you must and only if your camera has an Automatic Exposure Bracketing mode (we will explain this later), but it is likely that you will encounter problems aligning your images later on, so a tripod is generally speaking the best way to keep your camera stationary.
In some cases it is possible to stabilize your camera on a stable surface and take the shots without a tripod but the results remain uncertain.
For me a tripod is not a recommendation but a must.
Camera Features for HDR Photography
You don’t need an expensive camera to create HDR photography. Just about any camera can be used to make HDR photographs, but you do need a camera with two essential features: the camera must allow you to shoot images in RAW format and it must allow you to adjust the exposure settings in order to make multiple pictures with different exposures. Almost all digital cameras nowadays will allow you to this.
Shooting in RAW format
Most of the digital cameras sold today allow us to choose the format in which the photograph is stored onto the memory card of the camera. Without going too much into the technical details of the different file formats here, we notice that we usually can choose between JPEG or RAW format.
When you choose to store the picture in a JPEG format, the camera will make a data compression of the captured image and will write this compressed file on the memory card. The data lost through the compression will be lost forever and cannot be retrieved any longer.
When you choose to store your picture in a RAW format on the memory card, no compression will be made on the data of the picture and all these extra information on light levels and details of the photograph remain available for future improvement of your picture in post-processing. Your file size will be bigger of course but the advantages are huge when it comes to improving your pictures.
Camera Settings for HDR Photography
Some general guidelines and explanations on setting your camera correctly:
ISO setting
HDR post-processing has a tendency to exaggerate noise so it’s important to try and shoot with the lowest ISO setting that you can, especially in low light situations (at night). Noise is an unavoidable byproduct of applying tone mapping. We always can use de-noising software too, but I can assure you it’s always better to start with the cleanest images possible.
Aperture setting
In order to avoid a different depth of field between the different exposures and to prevent sharpness problems, we need to ensure that the aperture remains the same throughout the range of exposures. If you use Program, or another setting, the aperture (f-stop) will vary between the individual exposures, thus your depth of field will change. In that case, parts of your image will be more in focus in some of the photos than the others. When you process this you are left with sharp and blurry over one another, resulting in some weird image with sharpness problems.
So for HDR Photography we work in Manual mode or Aperture Priority mode.
It is tempting to set the aperture to f/22 and try to get sharpness in the entire scene but the problem is that at these high f-stops you are lowering the overall sharpness performance of your lens. By shooting somewhere in the middle (I use f/8) you will get a much better sharpness. Keep in mind that depth of field extends both in front of and behind your focal point. Thus, you can focus a bit in front of the back plane and your depth of field will reach all the way back, as well as be further extended towards you, while keeping optimum lens performance.
Focusing method
When you are shooting consecutive HDR source images, it is frustrating when your focus changes from the correct focus of your subject to an incorrect focus in the scene because it can ruin your final HDR image. This can happen because the Auto Focus (AF) on your lens changes every time you press the shutter on your camera. The solution is very simple: after finding, your subject in the scene, and using single point autofocus to set the proper focus, verify that it is correct and sharp, and then lock that focus on your camera lens by switching the lens to Manual Focus (MF).
You basically locked the focus now, and you can even recompose the scene if needed. Now, you can start shooting without worrying about your lens refocusing each time you press the shutter button. The focus will only change if you adjust the actual focal ring itself, but the focus will not change when you press the shutter.
Metering method
The metering mode used in HDR photography is largely irrelevant because finally we will be taking multiple exposures to cover largely the dynamic range of the scene. After creating hundreds of HDR photographs, I experienced that an exposure bracket of 5 exposures (-2 EV, -1 EV, 0 EV, +1 EV, +2 EV) or a bracket of 3 exposures (-2 EV, 0 EV, +2 EV) is in almost all cases enough to create a beautiful HDR. So in most cases I use matrix metering to initially meter the scene and get my base shutter speed (0 EV) and start from there.
However if I want to make sure that I will capture the entire dynamic range of the scene, I will have to determine the highest en the lowest shutter speed, given a fixed ISO and a fixed aperture. This metering technique is further explained in part 2 of this tutorial.
Exposure Bracketing
Making multiple pictures with different exposure levels is called exposure bracketing. Exposure Bracketing can be done manually and automatic depending on the possibilities of your camera.
Imagine taking a handheld photograph of a scene and you need to adjust your exposure manually… it is very probable that you will move your camera position and that’s exactly what we want to avoid – camera movement. It goes without saying that if you want to adjust the your exposure settings between the frames by rotating a camera dial manually, you definitely need a tripod.
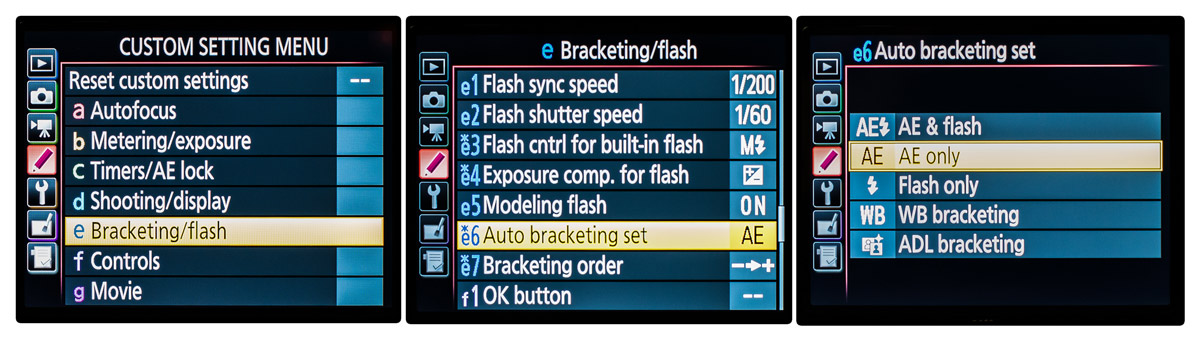
Almost all modern digital cameras have a feature called Auto Exposure Bracketing (AEB).
When AEB (and “AE only” as bracketing set) is selected, the camera automatically takes multiple photographs according to the set number of shots and the set increment in exposure for each frame. AEB allow us to set the number of pictures (brackets) we want to take and to set the difference in exposure between each picture.
The maximum number of shots and the difference in exposure differ from one camera model to another, but some higher end models, such as the NIKON D750 can go up to 9 consecutive shots and allow you to set the exposure increment from 1/3th of a stop till 3 full stops of light.
Thus, AEB will allow you to shoot multiple exposures in rapid succession with a single push of the button but if your camera doesn’t have this features, don’t let that stop you to make your HDR photographs by applying manual exposure bracketing method.
Auto Exposure Bracketing
Why should we use Auto Exposure Bracketing (AEB)?
Most DSLRs come with an Auto or Automatic Exposure Bracketing (AEB) feature, allows you to automate the process of taking multiple exposures of a scene.
Instead of taking one picture, adjust the exposure and press the shutter again, this feature allows us to take quickly a series of shots with different exposures by pressing the shutter only once.
Automatic Exposure Bracketing is useful to avoid touching the camera constantly between the shots. Manually adjusting the exposure between each individual shot can cause misaligned images by touching the camera for changing the exposure and pressing the button each time. Although this can be fixed in several photo software by aligning the frames but why fix something that can be avoided in the first place?
General method of AEB
Let’s go through the different steps I take to set up my camera, to measure the base exposure correctly and to actually take all the exposures I need.
Making the HDR source photographs with automatic exposure bracketing:
- Check the basic camera settings
First I check that my camera settings are correct for HDR photography: picture format on RAW, ISO as low as possible and activating AEB on the camera. I can already set the parameters I usually use for my HDR photography (number of pictures = 5 and increment = 1 full stop of light).
I usually shoot a bracket of 5 exposures with one stop of light difference (1EV). On a Nikon D750, we need to push the bracket button on the front side of the body and setting the parameters using the front and back dial.
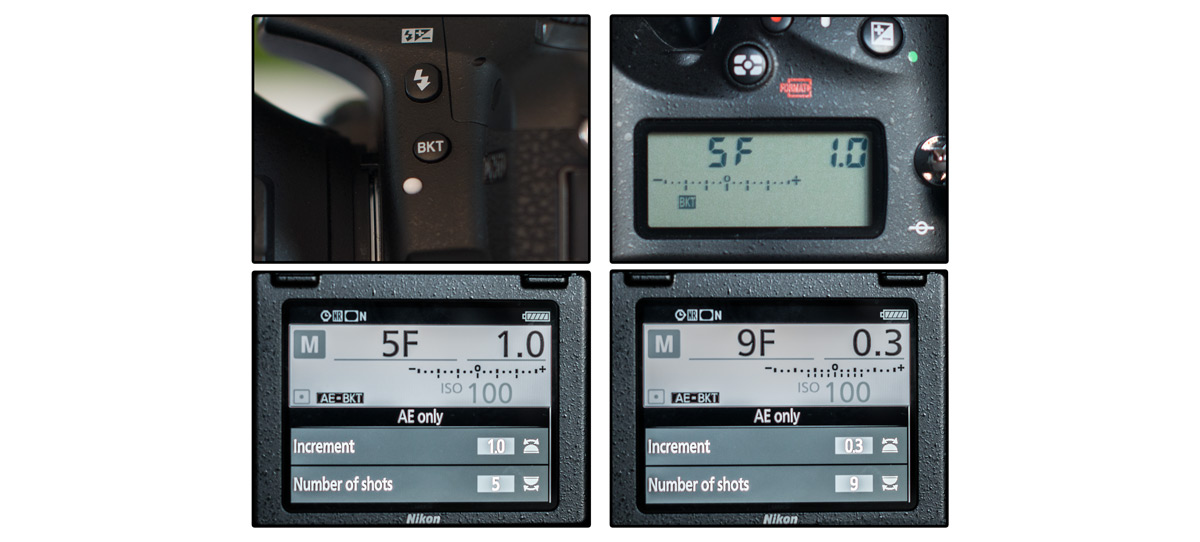
As you can see on the image above, on a Nikon D750 we can check the AEB settings on the back monitor and the upper control panel display. The Nikon D750 can make up to 9 different exposures in AEB mode.
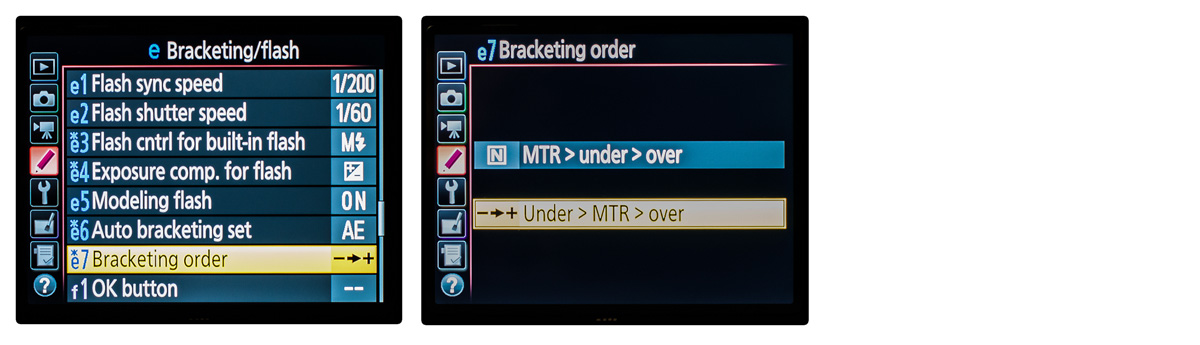
I prefer to set my camera to take the AEB exposures from lowest exposure to highest exposure. This facilitates reviewing the images later.
- Compose the shot
With the camera on a tripod, I make my composition of the scene.
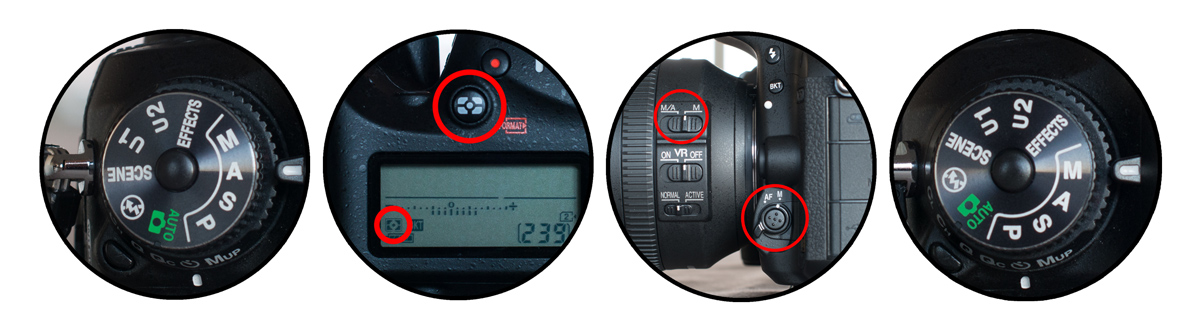
- Put the camera into aperture priority mode (A)
Although I will do the actual shooting in M mode, the A mode allows me to easily measure the base shutter speed for the scene.
- Set the aperture
Then I adjust the aperture (f-stop) according to the light and the desired depth of field for the scene. In a low-light scene you may need to increase the ISO to keep a good depth of field and to keep the longest shutter speed below 30 seconds.
- Set the focus on the correct subject in the scene
Now focus on the actual subject in the scene by moving the focus point to the subject and pressing shutter half-way down.
- Measure the base exposure
With matrix metering active, and while focusing, I metered the scene (pressing the shutter half-way down), which gave me the shutter speed for the base exposure of the scene. Once this is done, I switch the AF off (on camera or lens).
- Put the camera into M mode
I don’t want the camera to recalculate and change the shutter speed again when I start shooting so I switch the camera to Manual Mode (M).
- Set the first shutter speed
My camera is set to take the AEB exposures from lowest exposure to highest exposure. Therefor I will manually set the starting shutter speed to the according shutter speed of (-2EV). For example, if I measured a base shutter speed of 1/100s, the according shutter speed for an exposure of two full stops of light less will be 1/400s
- Take the different exposure shots
With the AEB parameters set, and AEB active, Autofocus Off and on Manual Mode, all you need to do is push the shutter button down once and the camera will automatically take all the different exposure photographs.
In this picture of the Big Ben, I metered the shutter speed for the base exposure at 1/125s, I dial the shutter speed down to 1/500s and was ready to take the 5 frames.
AEB is an easy method once you tried setting the parameters a few times. One of the most important issues when taking the source photographs for an HDR picture, even with AEB is the risk of camera movement. You push the shutter to take the shot, which may result in camera shake especially for the first frame. This problem can be solved by improving the stability of the tripod, and by using the self-timer on the camera or a remote shutter release. We will go deeper into these techniques in part two of this tutorial.
Manual Exposure Bracketing
Why do we want to apply Manual Exposure Bracketing (MEB)?
Most digital cameras allow auto exposure bracketing. The NIKON D800 for example can be set up to 9 different exposures. But there are still digital cameras around without AEB, or some digital cameras are limited in the quantity of shots and/or the increments of light that can be set between the shots. In those cases Manual Exposure Bracketing can be the way to go to get the required exposure shots for your HDR image.
General method of MEB
The method resembles for a large part the Auto Exposure Bracketing method. Let’s go through the different steps I take to set up my camera, to measure the base exposure correctly and to actually take all the exposures I need. I will take 5 exposures (-2 EV, -1 EV, 0 EV, +1 EV, +2 EV) with an exposure difference of one full stop and 0 EV as my reference base exposure.
Making the HDR source photographs with manual exposure bracketing:
- Check the basic camera settings
First I check that my camera settings are correct for HDR photography: picture format on RAW and ISO as low as possible.
- Compose the shot
With the camera on a tripod, I make my composition of the scene.
- Put the camera into aperture priority mode (A)
Although I will do the actual shooting in M mode, the A mode allows me to easily measure the base shutter speed for the scene.
- Set the aperture
Then I adjust the aperture (f-stop) according to the light and the desired depth of field for the scene. In a low-light scene you may need to increase the ISO to keep a good depth of field and to keep the longest shutter speed below 30 seconds.
- Set the focus on the correct subject in the scene
Now focus on the actual subject in the scene by moving the focus point to the subject and pressing shutter half-way down. Once this is done, I switch the AF off (on camera or lens).
- Measure the base exposure
With matrix metering active, and while focusing, I metered the scene (pressing the shutter half-way down), which gave me the shutter speed for the base exposure of the scene (0EV).
- Put the camera into M mode
I want to manually adapt the exposure between each shot by changing the shutter speed turning the dial, so I don’t want the camera to recalculate and set the shutter speed each time I push the shutter button. Therefor I switch the camera to Manual Mode (M).
- Set the first shutter speed
My camera is set to taking single shots. I will manually set the fastest shutter speed of (-2EV) according to the measured base shutter speed of (-2EV). For example, if I measured a base shutter speed of 1/100s, the according shutter speed for an exposure of two full stops of light less will be 1/400s.
- Take the different exposure shots
With Autofocus Off and on Manual Mode, we are going to take the five photographs. For taking the first exposure all I need to do is to push the shutter button (with the wanted shutter speed for (-2EV) already set). So I take the first shot.
After each shot, I will dial the shutter speed one full stop of light (normally 3 clicks) to double the exposure time, and I will shoot the next exposure (-1EV). I repeat this until I have shot all the brackets (0EV, +1EV, +2EV) I need.
I always shoot the exposures from darkest to brightest, so I start with the highest shutter speed (darkest exposure) and work my way down stop by stop to the slowest shutter speed until I have taken all the required exposures (this way my photographs are ordered from darkest to brightest). This facilitates to better group the photographs while scrolling through the results.
Some scenes can have such a high dynamic range, that we, in order to cover the complete dynamic range, need to measure the shutter speed for the darkest and brightest point of the scene separately, in spot metering mode. With these minimum and maximum shutter speeds we have determined the exposure bracket required to cover all the light levels. We will explain this second method more into detail in Part Two.
When you try manual exposure bracketing a few times, you will notice you will become handy and fast in executing this. One of the most important issues of MEB is the risk of camera movement, because in between the shots you are touching the dial to change the shutter speed and pushing the shutter button to take the shot. This problem can be solved by improving the stability of the tripod, and by using the self-timer on the camera or a remote shutter release. We will go deeper into these techniques in part two of this tutorial.
